


Advanced SUP Yoga Poses
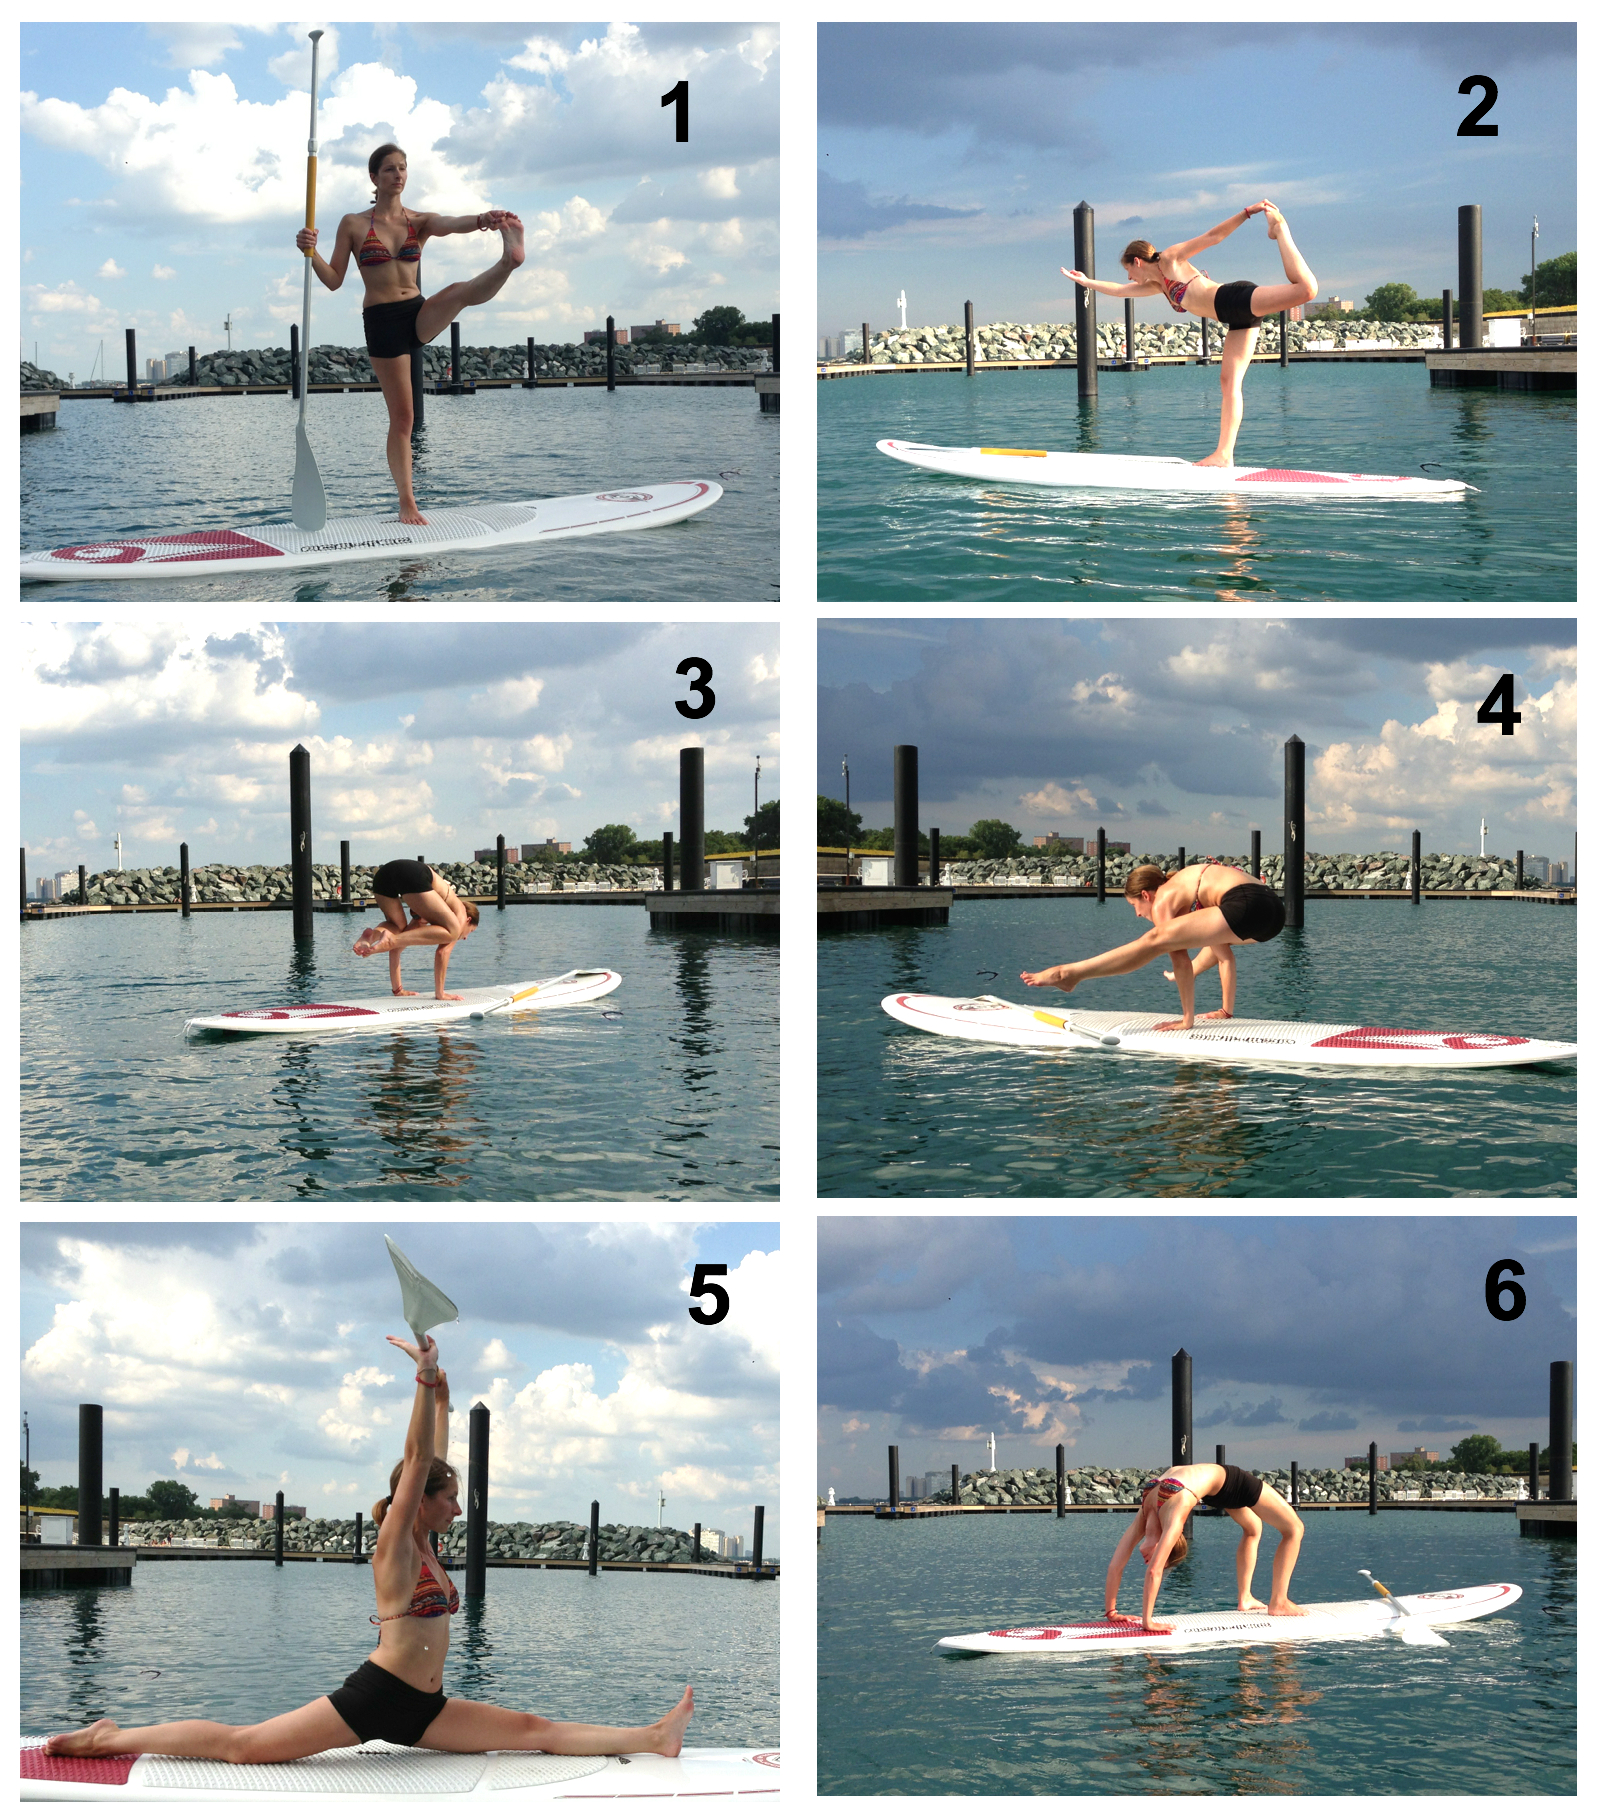
1.) Utthita hasta padangusthasana (Extended Hand-To-Big-Toe Pose)
In the beginning I suggest using a paddle to help balance.
Stand with both feet above the handle/middle of the board; hold the shaft of the paddle in the right hand. Place the right foot behind the left foot so the right toes point to right side of the board). Shift the weight onto the right foot. Send the right hip back to turn. Bring the left foot to meet the right foot. You should now be facing the right side of the board; the front of the board will be on your left. Place the blade of the paddle onto the board next to the right foot and pull down on the shaft. This will aid in your balance. Lift the left knee into your chest. Use the left hand to pull the knee in closer. Reach down with the left hand. Grab the left toe with peace fingers (like you’re making a peace sign) and your thumb. Extend the left foot forward. Press into the right foot and pull down on the shaft of the paddle.
ENERGIZE: Send energy out the left heel. It may help to flex the left foot so the toes are curving towards the knee cap.
Drop the left hip; engage core. Engage the legs. Stay steady! You may bend the standing knee slightly if that helps to balance. Take 3-5 complete breaths (inhale/exhale 1…). Bend the left knee back into the chest and release onto the board. Switch legs and complete the above.
2.) Natarajasana (Dancer Pose)
Stand in the center or just behind the handle/middle of the board. Press into the right foot. Bend the left knee. Send left heel to bottom of left glut. Grab left toe with left fingers. Reach right hand straight in front of you. Flip the palm up. Hinge forward at the hips. Get your torso as parallel to the water as you can. Kick the left foot into the left hand.
ANOTHER WAY: Instead of bending the left knee and sending the heel back you may bend the left knee in towards your chest. Keep your left hand under the knee cap. Raise the right arm above your head. Hinge forward at the hips. As you do so slide the left hand down your shin. When the left hand passes the ankle externally rotate the shoulder so your fingers are holding the tops of your feet. Keep hinging forward. Flip the right palm up. The right hand extends in front of you as the torso becomes as parallel to the water as possible. Kick the left foot into the left hand. Take 3-5 complete breaths (inhale/exhale 1…). Slowly come back to standing upright and release the left leg. Complete the above with the right leg.
3.) Bakasana/Kakasana (Crow Pose)
** NOTES before you try this. Number 1. Sunscreen makes your skin slippery so use your own discretion! Number 2. There are a couple of ways you can get into this pose. The instructions I have provided are those that have been the most successful with students who are beginning to advance. Number 3. Feel free to come into this pose with those methods that are most familiar to you.
— — — — — — — — — — — — — — — — — — — — — — — — — — — — — — — — — — —
From a standing position with feet hip distance apart fold forward, bend your knees and place your hands shoulder distance apart just above the handle/middle of the board; keep elbows slightly bent. Lift your heels to stand on tip toes and press the knees into the armpits. Suction the palms to the board by pressing the bottom of the knuckle joints into the board. Lean forward and lift your feet (one by one or both at the same time) off of the board. Bring toes together. Press the knees into your arms/just above the arm pit.
MAKE A SHELF OUT OF THOSE TRICEPS: By bending the elbows you can create a nice, flat space for your knees to “rest” on. Actively press them into the triceps as you tilt forward and lift the tailbone.
Engage the core and zip up the inner thighs. Take 3-5 complete breaths here (inhale/exhale 1…).
4.) Tittibhasana (Firefly Pose)
Stand above the handle and squat down with the knees hugging the shoulders. Lift your hips and place your hands shoulder distance apart just above the center of the board (right above the handle). Step the right foot over the right hand and place it outside the right thumb. Drop the right shoulder under the right knee. If you cannot get the shoulder directly under the knee hug the knee to the shoulder. Step the left foot over the left hand and place it next to the left thumb. Plant the right hand and left foot for balance as you drop the left shoulder under the left knee. You may have to reposition yourself a few times. Press into the palms and drop your sit bone as you extend both legs straight in front of you.
FLY ONE LEG AT A TIME: You may also press into the palms and lift/straighten the right leg first, then lift/straighten the left leg. Once the legs are extended in front of you lean forward slightly and send your sit bones up and back. Create length in the body by sending the crown of your head forward and your hips to the back of the board. Draw the breath in, nice and easy 3-5 times here (inhale/exhale 1…).
5.) Hanumanasana (Powerful Yogi/Monkey Pose)
*Be properly warmed up before attempting this pose.
From a standing position. Stand above the handle/center of the paddle board. Fold forward and place hands on either side of your feet. Step the left foot back. Place the knee and the top of the left foot on the board (as if you’re setting up for a low lunge). Shift your weight back; send your left hip over your left knee and straighten the right leg; heel on the board. Flex the right foot. Slide the right heel forward and the left foot back. Keep the hips square. Continue until the right hamstring is resting on the board. Keep the back leg straight. Tune into your breath and your body. Raise the arms in prayer at your heart center or above your head. Keep the spine lifted.
*You may not be able to rest the right hamstring on the board and that’s ok. Prop yourself up with your hands (keeping your spine as straight as possible) if you are having trouble. This will allow you to feel the stretch and gradually get into the pose.
POWERFUL MIND: This pose is challenging to most people. Even the flexible ones. It’s a deep hamstring stretch and lengthens the hip flexors (a group of muscles connecting pelvis to femur; most of which are very deep in the skeletal structure which means you can’t just poke at them with your fingers). As you learn to get into this pose keep this in mind: Hanumanasana is about energy, not about being able to do the splits. No matter where you are in the pose always take time to focus on your breath and tune into the energy that is being created by this asana. After all, it is named after the powerful Hanuman.
Take at least 5 complete breaths in the pose (inhale/exhale 1…). To get out of the pose release your hands along your side. Press palms into the board to lift yourself up. Bend the back knee and draw the front knee in towards your torso. Slide the right foot back to meet the left. Complete this pose on the left side.
6.) Urdhva Dhanurasana (Upward Facing Bow Pose or Wheel Pose)
Lay down on the board. The hips should lay just below the handle/middle of the board. Place hands at your sides. Bend the knees and place feet on the board close to the gluts. The tips of the middle fingers should be able to graze the backs of the heels. Raise the arms. Bend the elbows. Place the hands next to the ears with the finger tips pointing towards your feet. Lift your hips. Press into the palms of your hands and lift the head. Place the crown of the head on the board.
CHECK POINT: Look at the elbows and wrists. Are your elbows over your wrists? ‘Cause they should be!
Now, press into your hands and your feet as you raise the hips and chest. Engage the quads; mentally send the knees forward. Relax the gluteus maximus. Send the heart forward. Take 3-5 complete breaths (inhale/exhale 1…). If you’re really into it, keep the hips square to the sky as you lift the right leg straight up and take a few breaths; then switch and lift the left leg. Come out of this asana with control. Slowly bend your elbows and lower the crown of the head onto the board. Bring chin towards chest and release the upper, middle, and then lower back. Bend the knees in towards your chest to release any tension in the back muscles.
“If you do things well, do them better. Be daring, be first, be different, be just.” Anita Roddick